Single post
Vizou Events Manager – Tools
Import and export events in WordPress
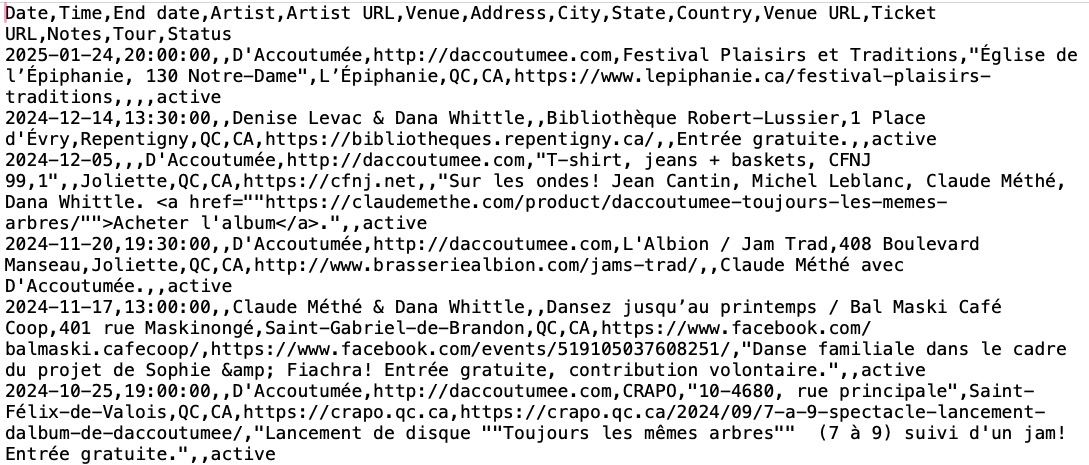
The import tool is only compatible with a CSV file (“comma separated values”, sometimes called comma-delimited). A CSV file would look something like this if opened with a text editor, with each event entry’s content separated by commas, following the format of the first line, which is the “header” row if you open the CSV file in a spreadsheet application (Numbers, Excel, etc.). Once you’ve opened your CSV in a spreadsheet app, check the following :
- Whether you are importing events from a GigPress or other CSV file, just make sure the columns and column headers exactly match the list below (the order doesn’t matter). You can edit your CSV in any spreadsheet application (Numbers, Excel, etc.).
- Be sure you don’t include table headers in your CSV file or your import will fail (this is an option on export in some spreadsheet apps).
- Remove extra columns or add any missing columns – they can be empty if you don’t need that data, but they need to be there for the import to function properly.
- If you had thumbnails (a featured image) with your events, you will have to add these manually, as this import/export tool doesn’t import or export images (a complex process).
Required columns
Order doesn’t matter.
- Date – any valid date format but best results are with Y-m-d
- Time – any valid time format
- End date – any valid date format
- Status – active, cancelled, sold_out, reschedule are the defaults for this plugin
- Artist – the name
- Artist URL – valid URL
- Tour – text
- Venue – text (by default, this will be the event “title” as well)
- Venue URL – valid URL
- Ticket URL – valid URL like
https://yourdomain.com - Ticket email – valid email address like
you@yourdomain.com - Ticket button label – text (optional, add this to your CSV if you have been using custom button text labels in a current install of this plugin)
- Address – street
- City – text
- State – text (abbreviation or full name is your choice)
- Country (any format – CA or Canada is fine)
- Notes – any text
Sample CSV format
Download a sample of the required csv format
Export GigPress shows from the database
In some cases, the formerly functioning GigPress export feature is no longer working. Here’s how I export everything needed from PHPMyAdmin (I sometimes make small tweaks in a spreadsheet app like Numbers or Excel).
- Visit your CPanel or other control panel and log into PHPMyAdmin.
- Click on your WordPress database – you’ll see a long list of tables on the left, including these GigPress tables – wp_gigpress_shows (main table), wp_gigpress_venues, and wp_gigpress_artists. If your database uses a different prefix, you’ll see that instead of “wp_”.
- Click on the SQL tab at the top and copy the following SQL query into the blank area there.
SELECT
s.show_date as 'Date',
s.show_time as 'Time',
s.show_expire as 'End date',
a.artist_name as 'Artist',
a.artist_url as 'Artist URL',
v.venue_name as 'Venue',
v.venue_address as 'Address',
v.venue_city as 'City',
v.venue_state as 'State',
v.venue_country as 'Country',
v.venue_url as 'Venue URL',
s.show_tix_url as 'Ticket URL',
s.show_notes as 'Notes',
t.tour_name as 'Tour',
s.show_status as 'Status'
FROM
wp_gigpress_shows s
LEFT JOIN
wp_gigpress_artists a ON s.show_artist_id = a.artist_id
LEFT JOIN
wp_gigpress_venues v ON s.show_venue_id = v.venue_id
LEFT JOIN
wp_gigpress_tours t ON s.show_tour_id = t.tour_id
ORDER BY
s.show_date DESC, s.show_time ASC- Run the query by clicking the Go button at the bottom right.
- If the query comes back with no errors (usually a green message), click on the Export option near the bottom of the screen – a new screen will load.
- You can leave the screen on the “Quick” view (the default settings are usually good) and select the format CSV from the dropdown.
- Click the Export button and save the CSV file to your hard drive with a good title.
- Once downloaded, you can open it up in the spreadsheet app of your choice. You may want to delete any “NULL” content and change the lowercase “active” to “Active” so it matches the default status in the Vizou Events Manager plugin. You can correct or revise anything while you’ve got it open.
- Export your cleaned-up data from there as a CSV file, then follow the import instructions above to import it into your site.